Monday, August 12, 2013

My Paper Pumpkin-July Addition


I decided last night to actually open my July MPP and DO IT! I put together one of the "original" ideas and then made two cards out of the remaining materials! (Not to mention, that you get stamps and ink spots to KEEP and REUSE!) So, pretty much I used all the product in the box as I said, but added a couple of pieces of Early Expresso Baker's Twine to the first card and a scrap of DSP from the Birthday Basics and that was it! Well, except for the couple pieces of cardstock for the cards,  and I stamped out an image from the Lovely Label stamp set for the second card, but as you can see it is minimal and there's endless possibilities!  Its going to be fun to receive them every month and see what can be made out of each one!  And did you know...........that now through August 31st  you can get the NEXT TWO MONTHS for $10.00 (THAT INCLUDES SHIPPING!) Go ahead, TRY IT! Just remember to add my name as your demonstrator! 
https://mypaperpumpkin.com/en/

Saturday, August 3, 2013

Thank U Edgelit Puse

 I wanted to give the neighbor girl something handmade for taking care of our little kittens while we were gone to SU! Convention and her mom said her favorite candy is Rolos, so I thought I'd make something to put some of those in and some money for her wonderful efforts.  I used the Edgelit Framelits to cut the edges of a piece of 12 x 6 cardstock that I had scored at 5 1/2 and 6 1/2 to form the purse.  The inside of the purse that holds the contents is 4 x 10" and scored on each long side at 2" and then folded up and glued inside.  I used the same edgelit for the outside piece of Polka Dot Parade paper (this one is Razzleberry) and cut each edge with it to get this design.
I stamped the word THANK with the first Photopolymer stamp set Designer Typeset in Rich Razzleberry onto Whisper White cardstock that I had stamped the dotted pennants from Pennant Parade stamp set using Daffodil Delight ink and then punched them out with the Pennant Builder punch and layered them onto Melon Mambo, Pumpkin Pie and Daffodil Delight pennants.  I stamped the "U" using the Morning Post alphabet stamps in Pumpkin Pie onto WW cardstock and punching out with the 1 1/4" circle punch and layering onto Melon Mambo 1 3/8" circle.  I added different colors of Itty Bitty flowers and one Silver Glitter one to the "U", and finished them off using Basic Rhinestones.  For the handles, I cut 1"x 11" strips of cardstock and stapled with mini staples and covered them with the Large Rhinestones.

Sunday, July 28, 2013

Sketched Birthday Fancy Fold Swap

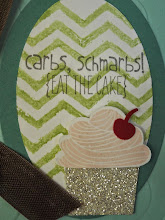
 Okay, so before I get started on this card...please picture this cupcake with cute little "sprinkles" from a tiny little punch in different colors on top of the cupcake...yeah, TOTALLY forgot to add them before I headed off to Convention...duh! This was one of my Fancy Folds swaps, it is the Wacky Squash Card that I did for a class back in May and had so much fun, that I did one with all new product!
 I started with a Smokey Slate card base and added a layer of Co'ordenations cardstock, Crisp Cantaloupe to be exact, and ran it through the Big Shot using the Chevron Embossing Folder and sanding it slightly.  I added some Birthday Basics DSP (Did you know that through this month you can buy 3 packs get one FREE!-Contact me if you need to order some!) layered over a strip of Raspberry Ripple cardstock and tied a 1/8" Bermuda Bay ribbon around it.  I cut a label from the Deco Labels die in Smokey Slate and punched a 2 3/8" Scallop Circle from Silver Glimmer Paper and layered a 1 3/4" Summer Starfruit circle onto that.  I then stamped the cupcake image from the stamp set Sketched Birthday in Basic Gray ink onto Crisp Cantaloupe cardstock and punched it out using the 1 1/4" circle punch and adhered it with a Dimensional and finished off this "tag" with a bow. (LOVE THIS RIBBON!)
 Then I stamped the sentiment from Remembering Your Birthday stamp set in Basic Gray onto Very Vanilla cardstock and snipped the edges.
This is the wacky part....I folded up cardstock and adhered it to the inside of the card.   I love making these cards! And believe it or not, it's easy peasy!

Monday, July 22, 2013

Timeless Talk- Convention Swap

So, as most of you know, I just got back from Salt Lake City for Stampin' Up! 25th Anniversary! WHAT A TIME! Nothing like spending 2 1/2 days with 5,800 stamping fanatics!  This was a really special one for me.  I got to walk the stage 3 TIMES! One for my 10 years! Once for my incentive trip ACHIEVEMENT! and once for Annual Sales! Now, I don't like being in front of a camera, but you have no idea how "nervous" I was when I was on the JUMBO TRON! EEK! Anyway, I had a once in a lifetime opportunity and wouldn't trade it for anything! 
Here is a swap card I made for an Organized Swap.  I used the Timeless Talk stamp set and stamped the telephone with Early Expresso onto Very Vanilla and added an Antique Brad in the center for the rotary dial, and then used the Circles Framelits to cut out the image and then a slightly larger one for the Island Indigo behind it.  I popped up the image with Dimensionals. I stamped the background using the Chevron Background Stamp in Daffodil Delight ink onto Very Vanilla cardstock, and used my 1" circle punch to punch just in half way for the Cherry Cobbler Chevron ribbon to wrap around.  I stamped the Hello There from the same stamp set in Cherry Cobbler onto Very Vanilla, punched it out with the Duo Ticket Punch and sponged the edges with Early Expresso and used a Dimensional behind it. I punched out a Cherry Cobbler Heart using the Small Heart Punch and placing it behind the sentiment and punched out a Daffodil Delight and Island Indigo Itty Bitty flower and added a Basic Pearl to the center of each one and roughed up the flower edges.  I will have a couple more swaps to share in the coming days, but for now, I need to get my Christmas Stamp a Stack packed for Wednesday! Thanks for stopping by!

Saturday, July 13, 2013

June Card Class Overload!

 Okay, I am slightly behind of posting these, tommorrow is my last day for JULY classes and I leave o Wednesday for Stampin' Up! Convention, so I decided to just go ahead and give you the rest of the cards we made during out June classes.  This first one I wanted to give them all experience with WASHI tape which is the new craze in papercrafting. I also wanted to get back to my Brights and this tape helped me do just that.  I picked out some colors from the tape and it turned out bright and cheery.  I layered Whisper White with Daffodil Delight and Melon Mambo cardstock, and ran my last layer of Whisper White partially through the Big Shot using the Perfect Polka Dots folder.  I laid the tape down just slightly overlapping each other on the non embossed end. I stamped the gingham circle in Island Indigo onto Whisper White using the Kind and Cozy stamp set(one of my new faves!) and punched it out using the 2 1/2 circle punch.  I stamped the sentiment from the stamp set Really Good Greetings in Melon Mambo and punched out using the 1 3/8" circle punch and popped up with Dimensionals.  I punched out a tiny heart from Island Indigo from the Owl Punch and added a rhinestone.  I finished it off by folding over a piece of Daffodil Delight 1/4" Stitched ribbon and adhering it to the back of the circle.
 This card was my favorite! I am IN LOVE with the new In Colors! I started by layering Whisper White with  Baked Brown Sugar and another layer of Whisper White ran through the Big Shot and Mosaic embossing folder. I stamped 2 Crisp Cantaloupe and 2 Pistachio Pudding mosaic tiles from Mosaic Madness stamp set and punched out with the coordinating punch.  I glued down flat the Crisp Cantaloupe and popped up the Pistachio Pudding ones.  I added two Itty Bitty Flowers to the centers of the Pistachio Pudding tiles and a rhinestone to each. I wrapped Natural Linen Thread around the top layer and adhered it down.  I finished it off by cutting a strip of Crisp Cantaloupe from the Adorning Edgelits (love that scallop!) and stamping the sentiment from Really Good Sayings in Baked Brown Sugar onto Whisper White and popped it up on the front of the card.
 This one I got lots of chuckles out of.  It's not all my idea, but I knew I had to break out those Photopolymer stamps and show them how awesome they are!  I punched the records from 1 3/4" Circle punch from Basic Black cardstock and the centers from 1" circles of Old Olive, Pacific Point, Daffodil Delight and Real Red.  Poked holes using the Piercing Tool and mat.  I stamped the sentiment from the Photopolymer Stamp set Bombs and Birthdays.  Added a strip of Basic Black and some of our Teeny Tiny Silver Brads.
Again, another FAVORITE color combo! This card is made by layering Coastal Cabana with Crushed Curry and another layer of Whisper White cardstock.  I added a strip of Eastern Elegance DSP and a strip of Coastal Cabana both notched out with scissors.  I ran a strip of Whisper White through the Big Shot using the Adorning Accents folder(the hearts) and layered it onto a strip of Coastal Cabana.  I stamped a frame from Four Frames in Coastal Cabana ink and punched out using the Decorative Label Punch, layered with a piece of Smokey Slate punched out with the Large Oval punch and then the sentiment, which was stamped from Label Love Bundle with Crushed Curry onto Whisper and punched with the coordinating punch, and popped up onto all of those other components.  I added the birthday hat by stamping in Smokey Slate ink directly onto the card front using the Birthday Sketches stamp set. And of course, I added a Basic Rhinestone to finish it all off.  Okay, so this may be "it" for awhile, as I said before I will be gone to SU! Convention Wed-Sunday and then turn around and leave again on the 25th to take my two remaining girls at home to St. Louis for 4 days for their vacation! Depending on how much time I get in between, I may have some awesome surprises from Convention to show! Have a wonderful weekend and see you soon! Thanks for stopping by!

Thursday, July 11, 2013

It's a BIRTHDAY BASH!


Welcome to our Birthday Bash! Hopefully you were over at Annie's blog http://www.lovemecard.blogspot.com/ before here, but if not, head on over there too! It's the 25th Birthday of Stampin' Up! and we wanted to celebrate with you.  For this card(this is a card for a swap at Convention, I sure hope nobody is here from my group...lol) I used that awesome Birthday Basics DSP ( and this month, buy 3 packs and get one FREE!)to make the double pocket card.  The colors are so bright and cheery in this paper pack, it SCREAMS CELEBRATE! I stamped the cake and the word celebrate with Soft Suede ink onto Very Vanilla cardstock and left them uncolored.  I attached the "celebrate" to a toothpick for a fun little flag.  I punched out the cake with the 1 3/8" circle punch and a piece of Crisp Cantaloupe with the Scalloped Circle punch and added some fun little holes using the 1/4" handheld punch and adhered it to the front of the card. I added a strip of Silver Glimmer Paper with a piece of gorgeous Pistachio Pudding Ruffled Ribbon around to the bottom part of the card. (Stunning!)  For the tags, I just layered Very Vanilla cardstock with Bermuda Bay cardstock and stamped the balloon and the Happy Birthday in Soft Suede ink.  I stapled some Raspberry Ripple Stitched Ribbon to the top of each and stuck them in each pocket.  I had to make 11 of these cards and had a blast doing so!   Thanks for stopping by and looking....  now you should go check out Jennifer's blog http://www.happy2scrap4life.blogspot.com/!

Other Participants:

Wednesday, July 10, 2013

All Dressed Up!

I cannot get enough of this Framelit set! I just love it! I even have a class planned out for fall with it...anyway...I thought I better get some cards posted, afterall it's been 2 weeks! I'm getting ready to head to Convention in a week so it's been swap central here and I still have 3 card classes to do before I leave. That's what I love about my job, being able to feel giddy about all the above. This card I started out with a Midnight Muse base, added a layer of Pool Party and a Very Vanilla ran through the Big Shot with the Fancy Fan folder.  I wrapped a piece of Midnight Muse Stitched ribbon around a strip of Real Red cardstock and tied a bow and adhered it to the cardfront.  And because of the AWESOME MAGNETIC PLATFORM, I was able to show the girls how to make this dress in ONE CUT! I used a strip of Pool Party and a strip of DSP from the pack of Etcetra(the houndstooth pattern)and lined them up beside each other and stuck the die down on the platform over them, centering the top and bottom and ran it through...VIOLA! LOVE IT! Then I added a strip of Baked Brown Sugar for the belt and punched out an Itty Bitty Flower from Real Red and added a Basic Pearl. I stamed the sentiment from Four You in Real Red onto Very Vanilla and fussy cut it out and snipped the ends to make a banner, then popped it up on Dimensionals.  Come back tommorrow for ANOTHER BLOG HOP!