Saturday, December 13, 2008

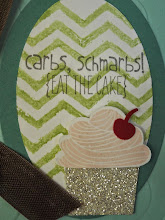
Sixth Day of Christmas-Top Note folded card


Wow, half way through the 12 days already. That only means that the real day is closer too.........

Hope you are enjoying are being inspired to get crafting by my posts..

Friday, December 12, 2008

Fifth Day of Christmas -Oragami Treat Box


Here is the picture of today's project, forgive me, I will post the instructions later today.
You will need a piece of cardstock cut to 11 7/8" x 8 3/4".
Step 1: With the 8 3/4" side across the top of the paper cutter (using score blade for these steps), score at 2 7/8" and 5 7/8".
Step 2: With the 11 7/8" side across the top of the cutter, score at 1 1/2" and 4 1/2" from top to bottom. Score at 2 1/2" ONLY from the top edge to the first score line, skip over the middle, and score from the second score line to the bottom edge. The middle section that is UNSCORED should measure 2 7/8".
Step 3: In all four corners, cut the 2 1/2" vertical score line from top edge down to the horizontal score line. On that same horizontal line, cut from the 1 1/2" vertical score line over to the 4 1/2" vertical score line. It should form a "T".
Step 4: Turn cardstock over and fold up toward you on all score lines. Bring the middle sections in together, overlapping the sides. Adhere them in place to form the base of the box. Using scissors miter the corners of all 4 sides of the 1" wide sections. Bring those sections in and adhere to the inside of each lid section.
Step 5: Bring sides up to meet in the middle to complete the box. Embellish as desired.
The size of this box is approximatley 3" square.

Thursday, December 11, 2008

Fourth Day of Christmas-Bread Box


Step 1: With a piece of 8 1/2"x 11" peice of cardstock, score all sides at 2 3/4". Then go back and score at 1/2" all on sides. (SEE first picture with blue and red marker lines-these are ONLY to show you what it should look like).


Step 2: Cut away the corners on all sides (see next two pictures for referring too)


Step 3: Cut into the the long sides of cardstock to make flaps (see picture)


Step 4: Add Designer paper where I have shown.


Step 5: Add adhesive to outside flaps and fold in to the middle flap and finish box.

Wednesday, December 10, 2008

Third Day of Christmas-Winter Post Card


I am throwing in a few cards here and there, so here is the first card of the week.

Stamps:Winter Post

Tuesday, December 9, 2008

Second Day of Christmas-CD Cookie Sleeve


This is really a simple inexpensive gift to give. All you need is cookies, and CD sleeves and a Coluzzle, oh and some lovely papers and stamps......


All you are going to do is cut your paper to 5x5 square and then center your Coluzzle in the middle and cut the fourth circle FROM THE MIDDLE out and then place onto your CD sleeve. Decorate.


Or you can just stamp the sleeve.

Monday, December 8, 2008

First Day of Christmas-Wine Tote


Supplies:


Cutting and scoring blades


12x12 cardstock and one piece of 1 1/2" x 12" for handle


strong adhesive


Decorative papers and/or stamps and ink


If you are going to just use stamps and no other decorative papers, STAMP IT NOW before moving on.


Step 1: Score 12x12 cardstock at 2 1/2", 5 1/2", 8" and 11".


Step 2: Turn half turn and score all the way across at 2 1/2". Using scissors, cut UP TO the score line here. (Just at the 2 1/2 score line you just made-see first picture above- the dark lines are the cut lines- you will notice the little corner piece is cut completely off on the bottom right side-do this while you are here.)


Step 3: Put on your adhesive as indicated in the next picture where it says "TAPE" and start folding on your score lines, from left to right until you end up at the end with the 1/2" tab (this should tuck inside the box).


Step 4: Punch holes on the two narrow sides of the box where you want your handles to be. Then punch holes into your handle piece and add your brad or eyelet. Decorate the rest and your finished.