This is a candy basket (forgive me for not putting candy in it, but I had nothing to hang this on for the candy to stay in, kept falling out) but it will hold a fair amount of chocolate. I started by using the largest Heart in the Sweet and Sassy Framelits set and cutting two of them from Very Vanilla card stock. I made the "basket" part by just cutting a strip of Very Vanilla and scoring it in half, then on each long side at 1/4" and folded into a "v" shape and adhered it to each of the hearts. I added a handle to it of card stock and finished it up tying a beautiful bow of Blushing Bride Striped ribbon. The next photo shows it sideways so that you can maybe make sense of those directions.
For the front decoration, I used the Falling In Love Designer Series Paper (#142798) from the Occasions Catalog. I used Sahara Sand card stock also and just cut the next two sizes(layers) of hearts that are in the set of dies. I then went to my favorite Valentines BUNDLE in the Occasions Catalog, Sealed With Love. You get a ton of stamps and dies in the bundle. It includes the die to make this adorable envelope, plus another one that is showcased on my next project.
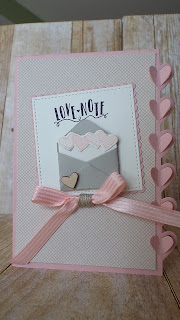
This is my card to give with the candy. I started by making the base from Blushing Bride card stock and then using the fantatic heart border die also included in the bundle. Once I cut that, I pulled up the hearts to give them dimension.
Here is a close up. Just under those hearts, I glued a piece of the Falling in Love DSP along the edge to separate the Blushing Bride. I added a pattern piece of DSP to the front of the card as well, for breaking up the colors.
For the focal point on the front, which I think it's fair to say, the heart border is a focal point for sure, I went ahead and continued using the bundle. I used the Scallop Squares to cut the Blushing Bride square, and then I cut a piece of Very Vanilla from the Stitched Framelits and stamped out the Love Note in Archival Black ink. I made another sweet little envelope from Sahara Sand (this is the second envelope die in the bundle) and then stamped out the hearts from one of the stamps in the stamp set in Blushing Bride and used a framelit made just for these, to cut them out and glued them inside the envelope.
I added a wooden heart from the Wooden Embellishments (also featured in the Sending Love product suite) to the front of my envelope. Then again, I used that gorgeous ribbon, tied a bow and then wound some Linen Thread around it several times to break up some color again. THANK YOU for stopping by!
Please head on over to Deb's blog for MORE inspiration!


