Friday, October 25, 2013

Fancy Folds Card Class II

I held this class in late August and early September for two different groups of customers and a couple of them were unable to attend on the dates that I had scheduled so we just this week got them all caught up so I can now post the cards we did.  Due to the plethera of product used, I am not going to list it all, but I will post all the photos at once.  The first one we did was the Napkin Fold Card and used The Birthday Sketches stamp set and Birthday Basics DSP:


This next one is the Neverending Card and I used Polka Dot Parade DSP and the Cycle Celebration stamp set:


The next one is the Cascading card: I used the Flower Shop stamp set and Posey Punch and the Bird Punch for the leaves and one of my favorite stamp sets Really Good Greetings:
The next one is my "go to" card for gift giving in the form of cash or gift cards, it's the Box Card-LOVE making them. I used the Gingham Garden DSP pack and Kind and Cozy stamp set.

The last one is just a simple Stair Step card.  I used the stamp set Blast Off and Brights cardstocks and inks for this card:
I have so much fun teaching these classes, because it challanges me to step out of my simple thought process but I love seeing the ladies excitement as they finish them and just say WOW!  I already have my Fancy Folds III class in planning stages and will be posting the details for that early January!  Hope you have enjoyed some fun cards today, now go stamp something!

Thursday, October 24, 2013

Truly Grateful Class

 When I got the Holiday Mini catalog back in the summer, I knew right away that I wanted to use so many of the fall items for a class.  I came up with a class that we made a Journal Jar.  I wrapped the jar in Sweater Weather DSP and then added a piece of Burlap Ribbon to it.  I stamped out Thankful For in Soft Suede onto Very Vanilla and using the Deco Labels Framelits, I cut it out and sponged it.  I punched out 4 Tangerine Tango Blossom Flowers and crinkled each one up and unfolded them and held them together using an Antique Brad and hot gluing it onto the tag and then using Very Vanilla Seam Binding, threaded it throught the tag and onto the jar.
 I also had them make a tea light luminary.  This was simply a whole piece of Smokey Slate cardstock cut in half lengthwise and scored on the long side at 2 3/4 on each end.  I layered the outside panels with the Sweater Weather DSP and cut leaves from the BigZ Autumn Leaves die from Champagne Glimmer paper and some from the Sweater Weather DSP.  I added some Vintage Lace Ribbon and a Vintage button to one of the panel and stamped just the word Thankful onto a stip of Very Vanilla in Tangerine Tango and flagged the ends.  For the center, I used two different sizes of the Window Frames Framelits and cut just the front piece of Smokey Slate with the smaller die, and a piece of Crushed Curry with the larger one and ran the Crushed Curry one through the Perfect Polka Dot folder and lined them up and adhered them together. Berfore glued the back to the front, I added a piece of Vellum Cardstock behind the opening.  I added some Basic Pearls to the corners of the opening.
I made this frame from a 5x7 frame.  I started out using a piece of the houndstooth print from Sweater Weather DSP pack and layering another piece of it, sponging the edges before adhering it.  I stamped the "barnboard" in Whisper White ink onto Early Expresso cardstock.  I layered a piece of Burlap Ribbon over all of that and then ran another piece of the Sweater Weather DSP through the Autumn Leaves die and crinkled it up and sponged the edges.  I added another Vintage button and some Linen Thread and hot glued it to the leaf.  Once again, stamped the Thankful for in Tangerine Tango onto Very Vanilla cardstock, sponged it and flagged it.
I was hoping for more "fall" like temperatures for my attendees of this class to enjoy these projects before setting out next class projects(pictures coming soon), but hopefully they can still enjoy these with this cold snap we are having.

Monday, October 21, 2013

A Wedding Card- Fancy Fold Style-Box Card

 We had a wedding this past weekend to attend, and this past summer, I taught a SECOND Fancy Folds class, because I am always looking for different ways to fold paper.  This was my favorite "go to" fancy fold, because it doubles as a money or gift card holder,(also tags, photos, anything flat really).  I started by making the card, which is called a Box Card.
 Then I decorated the outside by cutting mats of Whisper White and Night of Navy chevron pattern from the Regals Paper Pattern Pack and adhering them to the outside panels.  Then I pulled out some of my unused (retired) Artisan something or other(sorry, I threw away the packaging a while back-but you don't need to know, it's retired-lol) pieces including the heart shaped tag and ribbon.  I stamped the Swallowtail butterfly onto the tag in Early Expresso and adhered it, along with the ribbon(Rose Red) to the belly band of the card in which I made out of Crumb Cake, Night of Navy and Whisper White cardstock.  I stamped the Mr and Mrs. from the stamp set Labels of Love in Crumb Cake on Whisper White and punched it out using the coordinating punch.  And then for the "layer" of Night of Navy behind it, I punched two more out and cut them in opposite directions and made the layer.
Here is the card open, it folds down flat and fits in an A2 envelope.  I stamped the Swallowtail in White ink onto Night of Navy and glued it to the inside of the box card.   Since the bride drove all the way home for the reception from AZ to Iowa, we stuck some money inside.  I'm already working on Fancy Fold III for late winter!

Friday, October 11, 2013

Thinlets Owl Card-CASE

 I knew when I saw this card idea from Carrie Rhoades, I just HAD to make one of my own.  I ran a piece of Whisper White cardstock through the Big Shot using the Thinlets Circle die.  I switched out the pattern paper and used the Nuetrals Pattern Paper Pack and picked out the Crumb Cake Chevron pattern. I cut it out using the Largest Oval Die (which is the Oval Framelits set) in Crumb Cake cardstock and layering it with the chevron piece and adhering just the amount I needed to each panel and trimming off the excess. Then I used various circle punches to complete the eyeballs in Crumb Cake, Whisper White and Basic Black.  ( I sponged them all on the edges of the Crumb Cake ones).  Then I used the heart die from the Thinlets set and made a pretty hairpiece for her hair and for her beak in Real Red.  I added a button from the Bold Brights Collection with threaded Pumpkin Pie cardstock through it.
Here is the inside...I used the Circle from the die set to make the layer for the sentiment.  I stamped the sentiment from Really Good Feelings onto Real Red Cardstock in Early Expresso, sponged the edges and adhered it to the "swinger" part of the card.  Now as I said before, this idea came from someone else, but I couldn't resist making one of my own. Thanks for stopping by!

Thursday, October 10, 2013

Stylin' Stampin' Squad Blog Hop -All Things Autumn


Thank you so much for joining us for the October Stylin’ Stampin’ Squad  Blog Hop! This month we are focusing on the Fall season. It’s the time of year when fireplaces start crackling with warmth and we dig out our sweaters. This month’s blog hop will showcase many of the Stampin’ Up! products that are available to make  Autumn themed creations. We hope you enjoy seeing how we use the products to create our projects and feel inspired to come up with some great projects of your own.  I know that for me Autumn means lots of things and having children at home still means that Halloween is going to take precedence over the beautiful fall leaves changing, so I chose to do Halloween for my projects.  Please remember to follow the links below to enjoy ALL the creations that the members of this blog have made for you to be inspired.
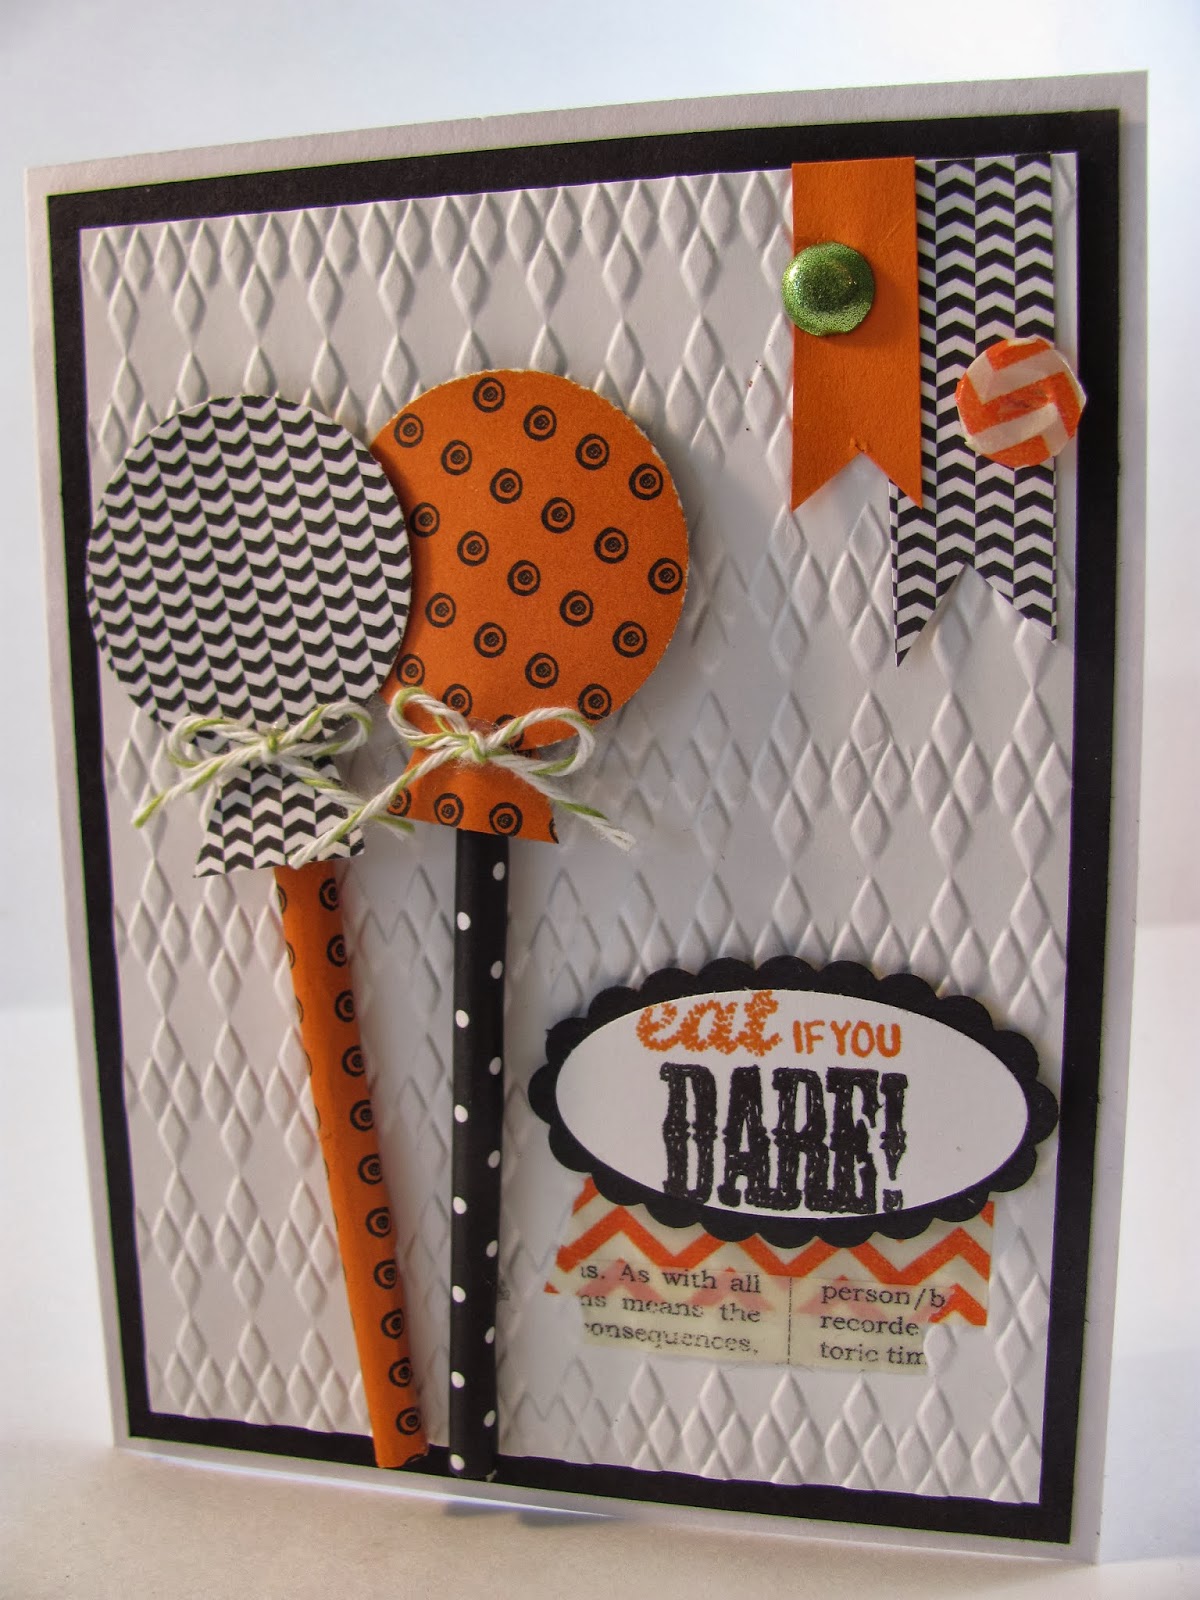
 This first card I was inspired by from Pinterest.  I switched it up to use all Stampin' Up! products only!  I started by running my Whisper White through the Big Shot embossing folder Argyle.  I made the lollipops by punching out 1 3/8" cicles from the Nuetrals DSP Patterns Pack and the other one I used the Witches' Brew DSP (the orange one) and punching the bottom of the wrappers using the Pennants Punch.  I tied some Lucky Limeade Bakers Twine (retired) to them.  I simply wrapped two lollipop sticks with the same DSP and stuck them down to the card.  I added some flagged pieces of the same black and white DSP from the Neutrals pack and just a scrap of Pumpkin Pie side by side and in the PP one I added a Brights Glimmer Brad, and the the black and white one, I wrapped a Vintage Faceted Button with Witches' Brew Washi Tape and stuck it down.  I colored the stamp from Halloween Bash with Basic Black and Pumpkin Pie markers and punched it out with the Large Oval punch and layered it onto a Scallop Oval of Basic Black and adhered it with Dimensionals.  I then just stuck down some more Washi Tape and it was finished.
This is a card I made for a Halloween Swap for Convention this summer.  I had so much fun doing it. The base of the card is made from Whisper White, Basic Black, and Summer Starfruit, in which I ran that layer through the Beautifully Baroque embossing folder and added a strip of Witches' Brew DSP and cut the scallop with the Tasteful Trim die, and wrapped some 1/8" Black Taffeta Ribbon around it.  I stamped the sentiment from the stamp set Halloween Bash and punched it out using the Ticket Duo Punch and bumping it up with Dimensionals.   Last Christmas we used the same "feet" for Elf shoes.  The feet are simply a Top Note cut into fourths(you only use two pieces for the feet/shoes) and then using two different sizes of circle punches, punching out to make the shoe hole and the pointy tips.  For my witches legs I just cut scraps of Very Vanilla and Pumpkin Pie and glued them down kind of catty whompus, so as not to match.  I punched out the flowers on the shoes from the Itty Bitty flower punch and colored some Basic Rhinestones with a orange Sharpie marker.  For the broom, I colored a lollipop stick with Black Sharpie marker and simply wrapped a piece of Crumb Cake cardstock around it and cut snips into it.
 And I committed to make one 3D item, so here it is.  I started by using a 10" foam wreath, and cutting 2" inch strips of Witches' Brew DSP and again the Nuetrals DSP stack and looping them over the wreath and taping them, and flagging the ends.
 I made a BOO banner out of the Natural Serif BigZ Alaphabet and Silver Glimmer paper for the letters, and Basic Black and Nuetrals DSP through the Perfect Pennants BigZ die, and punching out Pumpkin Pie Scallop Cirlces and using a 1/8th" circle punch on each scallop for some more depth.   I looped some Silver Ribbon(Holiday Mini) through each one to hang from the middle.
For the bow, I used the Bow Die and Silver Glimmer paper.  I simply pinned it to the wreath.  For the final touch, I stamped the witch from the stamp set Halloween Hello and punching it out with 1 1/4" circle and layering onto 1 3/8" Pumpkin Pie.  Now I know you are probably wondering why it says BOO and I have a witch on it, well, I didn't have a ghost and well, witches could be scary...lol I hope you enjoyed my projects today, please continue on to the next blog by following each link below.

Blog Hop Participants: 

  1. Shellie G. of Craft Smashup

  2. Pam S. of Stampin' in the Sun!

  3. Dawn S. of Dawn's Creative Chalet

  4. Darcy J. of DJ's Stampin' Place

  5. Jennifer C. of Happy 2 Scrap 4 Life

  6. Cynthia R. of Ink-a-Doodle Creations

  7. Jamie H. of Unique Ink

  8. Kim R. of Stamping with Kim

  9. Tonya B. of Stampin' with Tonya

  10. Diana E. of Stampin' Fun with Diana

  11. Annie L. of Love Me Card

  12. Rose C. of Stamp with Rose

  13. Heidi B of Stuck on Stampin'

  14. Bree R. of Craft-Somnia

  15. Anastasia R. of Stampin' Blondie

Saturday, October 5, 2013

World Cardmaking Day!

 Okay, so I only got two cards done for WCD!  That's actually more than I have done in the past two years on WCD...lol.  I had planned to spend most of my day in my stamp room, but watching the Goonies ended up being with Jenna and Mike and half asleep on the couch because it was so dreary outside.  Both cards are simple, I love clean and simple and often find myself trying to layer way to much.  The first card is made using Night of Navy as the base and Real Red Co'ordenations ran through the Big Shot with the Honeycomb embossing folder and then I ran my sanding block over it.  I then took the Sticky Rounds and placed one down on the card and did the ribbon flower using Crushed Curry Chevron Ribbon, twisting as I went along the Sticky Round.  I punched out two Small Ovals (from scraps of stamped cardstock) and adhered them just under the flower.  I then stamped on Whisper White Cardstock with Tempting Turquoise ink using the stamp set Yippee Skippee and punching it out with the Fancy Label punch and popping it up with Dimensionals.
The second card was made with Summer Starfruit as the base, layered with Raspberry Ripple and a piece of Birthday Basics DSP(candle paper).  I ran a piece of Crisp Cantaloupe through the Big Shot using a Square Framelit in the center to give it the "poloaroid" affect.  I stamped the greeting from the Really Good Greetings Stamp set onto Vellum using Bermuda Bay ink and layering it to the back of the frame.  I then stamped the cute little saying at the bottom with Basic Gray onto Very Vanilla and trimming the ends into flags and adding an In Color embellishment( cannot think of what they are at them moment) to that.  I hope you had time to go and stamp today.  I also hope the rest of your weekend is wonderful! 

Friday, October 4, 2013

Sweater Weather Pumpkin Punch Art Treat Bag

 Here is the 3D project we did for our Downline Event.  I got the idea from another SU! Demo, and I apologize for the lack of remembering who it was. We made this cute tag using the Chalk Talk framelits and running it through the Woodgrain Embossing Folder and sponging it with Soft Suede ink.   I punched out 3 Wide Oval Circles from the houndstooth pattern piece out of the Sweater Weather DSP and sponged the edges with Soft Suede ink and layered them to make a pumpkin.  I used the extra piece that came from the tag die for the pumpkin stump, sponged it and layered it behind and tied some Lucky Limeade (retired) Baker's Twine around it for some green and then attached the whole thing to the tag with Dimensionals.  I stamped Enjoy from Fabulous Phrases onto Very Vanilla cardstock with Soft Suede and sponged edges, punched out with the Modern Label Punch and stuck it under the pumpkin.
I LOVE the Washi Tape! It makes decorating clothespins so simple!  Just run it along the clothespin and fold under and tear off!  I ran out of Natural Hemp from SU! so I had some jute, and I used  that for the bow.  Finally, I attached the Burlap Ribbon just so it folded over the back of the bag.  Then I filled it with my favorite fall snack!