Wednesday, November 1, 2017

Snowflake Sentiments~

 Good Wednesday! I wanted to share some projects from a workshop I had on Monday night.  I told my hostess that it's never too early to start thinking about Christmas, so I based her party on Christmas. This is the first card that I made. It is a color theme that I always love to use with snowflakes. Smokey Slate, Whisper White and Soft Sky and Real Red.  I started by running the Snowflake Embossing Folder thorugh the Big Shot and flipping it over to the side that was inverted. I then wrapped some Smokey Slate Gingham ribbon around it and added a Year of Cheer embellishment to the ribbon before tying a bow.
I stamped a Soft Sky Snowflake onto Whisper White Card stock and the the sentiment in Smokey Slate ink over the top and then punched it out using 11/4 Circle punch and then punching a Real Red one using the 1 1/2" Circle punch and then adhering them with Dimensionals to the front of the card. I added some Silver Faceted Dots on the corner too.
Tommorrow, I will post the other card that I made.

Thursday, August 24, 2017

Hostess Appreciation Party~

 Every 6 months or so, I host a Hostess Appreciation party for my Hostess Clubs. They mean the world to me and without them, I wouldn't really have much business. I love them all. So, I try and provide them with fun projects to make and take home, as my THANK YOU! This is one of the projects I had them make.
 We ran another piece of Whisper White through the Big Shot using the new Woodlands Embossing Folder and then I had them use the Sponge Roller with Soft Suede Ink and cover the embossed side. Then I gave them the choice before assembling if they wanted the glass kept in or out. I kept mine in and just used hot glue to assemble the whole thing.
 I used the Bold Butterflies dies with Whisper White, Powder Pink and Calypso Coral card stock to make the flowers and butterflies. (The flowers are made from a retired die)
 I had them put the new Glimmer Faceted gems in the center of the flowers to hide the hot glue.
We finished them up by heat embossing the sentiment from the stamp set Layering Love, in Gold embossing powder.  I bought the frames online at Walmart.com. I hate to make it short, but I have my grandson coming over here soon. Happy Thursday!

Tuesday, August 15, 2017

Daisy Bundle

My husband and I were lucky enough to go to Hawaii for our 25th Anniversary in June. Not only did we not want to come back to reality, my husband who is a teacher seriously wanted to find a job while there, even joked about staying if he did. Well, reality is, it's too expensive to live there, but we plan to go back! So, while we were gone, we had some WONDERFUL friends that took care of our youngest daughter for a WHOLE WEEK! These are the cards that I made for them. They are pretty much the same other than the difference in color of paper. I used the Daisy Punch Bundle. I stamped the Daisies on vellum card stock with Versamark and then sprinkled them with Whisper White embossing powder and heated with my heat tool. I punched them, cut them in half and layered them to make them a little bit more full. I stamped the stems in Old Olive ink and then stamped the Thank you in the same color and then cut it out and flagged the ends. I adhered the flowers to the front of the card and then added the Faceted Glitter Dots in gold.
 The gold papers in the background of each one are from the new Bundle of Love Designer Specialty Series Paper Packs. THEY ARE AMAZING! The top one uses the Soft Sky card stock and the bottom ones are Blushing Bride card stock. The bottom one I ran a piece of Gold Satin Ribbon across to give it a pop.

Stay tuned for some projects we made at our recent Hostess Appreciation party and Christmas in July Stamp a Stack!

Monday, August 14, 2017

Back To School Treats~

 Hello everyone! I have been gone again for a long time. Life sometimes doesn't play fair, but for us, that's what we are used to I guess. The outcome was good, so I will not complain or go into detail, but I have tons of stuff to share with you in the coming days to play catch up.
This past weekend I was part of a Back to School Vendor fair, it was in small town, and the crowd was not super fluent, so I came home with all of these! Well, I guess that makes it easier for me the first week of school, treats are already made. :)
The pencils are Rolos and the erasers are snack size Kit Kats. I used all Stampin' Up! product that I could. They are time consuming, but they turned out really cute.
I'm off to take more pictures so I can upload them and share with you Have a super week!

Wednesday, June 21, 2017

Alligator Card~

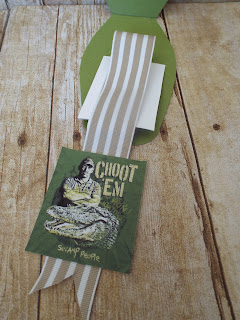
 Hello everyone! Today is a card that I made for a friend of ours, who thinks he is so funny. Well, he is, but we try not to inflate him too much. :) Kevin is his name, and since my daughter moved to Louisiana, he teases her when he sees her by talking in "swamp people" talk. He actually is very good at it, but as I said, we try not to "encourage" him- LOL! So, I wanted to make him a funny card and this is what I came up with. I started by free handing the shape of an alligator, and then cutting it out of Old Olive card stock. I ran it through the Big Shot with an embossing folder that I cannot recall the name at this point- but it's retired. I then also used another retired product, the Banner Punch, for punching out his teeth. I used 1/2" circle punch for his nose and eyes.
For the inside, I just cut a long piece of Crumb Cake Striped Grosgrain(retired also) ribbon to resemble his tongue and then printed out some Swamp People (television series) clip art and taped it to the inside. I turned out cute and he liked it.
Well, I'm off to card class all day. I have one more day until I leave for Hawaii and so I may not be back for a bit.

Sunday, June 18, 2017

Retirement Card #3~

 Here it is folks. Finally, the last card that I made for a customer. I used my favorite color combo (well for purple anyway- I don't care much for purple). I used Wisteria Wonder, Soft Sky and Whisper White.

I stamped the circles in the background with the stamp set Playful Backgrounds stamp set in Wisteria.

For the celebrate panel, I ran my Happy Celebrations embossing folder through the Big Shot and while the paper was still in the folder, I took the dot stamp from Big Celebrations stamp set and stamped over the word with Soft Sky ad Wisteria Wonder. I then took it out of the folder and stampe the other sentiment. 
I finished it off with Soft Sky and Smokey Slate ribbons. 
Well, I am in the process of finishing up Father's Day cooking, so I hope you have a father or someone who is like a father to you to celebrate this glorious day with! 


Friday, June 16, 2017

Up and Away Retirement card #2~

 So, here I am today! I have another one of the cards I was asked to make. I did this one in one of the new In Colors 2017-19 Powder Pink and then with Soft Suede and Whisper White. I stamped out the balloons in the Powder Pink Ink onto Whisper White card stock and then again on a scrap piece and cut it out using the matching framelit and then cutting out two clouds also using the dies that coordinate with this stamp set. I then stamped a retired stamp set, in which is completely is not coming to mind right now and I'm not in range of looking.
I tied a piece of Smokey Slate Thick Baker's twine around it all. Well there is two down and one to go. I will be back soon to post the last one.
Happy Friday!

Thursday, June 15, 2017

Up and Away Retirement card

 Hello everyone! I have some cards the next couple of days that I have made for retirements and birthdays. I will apologize in advance that this one and one other uses one retired stamp set (the "celebrate" sentiment) because I needed something to make the card pop and this was the perfect size. So, I made this pretty simply. I used two layers of Whisper White cardstock. On the front layer, I stamped out the clouds from the stamp set Up and Away in Soft Sky and then one more on a scrap and cut it out using the Up and Away Framelits.
 I cut out the square using the Stitched Shapes dies and cut it out of Crumb Cake card stock. I stamped the hot air balloon in Real Red on Real Red card stock and cut it out with the matching die.I tied some Night of Navy Baker's Twine behind it before adhering it to the card. I popped both the hot hair ballon and the cloud up using Dimensionals. I finished off that part by using a Soft Subtle Enamel shape(heart) on the front of the balloon.
And here's the retired "celebrate". I stamped it in Real Red and then stamped the other sentiment from the stamp set Happy Celebrations in Basic Black ink onto Crumb Cake card stock and just fussy cut it out.
I'm leaving for Hawaii in 7 days! I will do my best at getting the rest of my cards blogged for you before I go.
Have a great Thursday!

Monday, June 5, 2017

Graduation Party~

So, I forgot to add the photos of my daughter's Graduation party!  I meant to do that two weeks ago and I can't keep the days straight from one minute to the next.
So, here is how we set up her party, a lot of it is handmade. She wanted it to be a vintage theme so we did the best we could.


Project Life of course is the only way that I could have (and did!) gotten all of her photos into a beautiful display!

Wednesday, May 24, 2017

Graduation 2017 cards~

 When you husband is a teacher and he brings home lots of Graduation invites, well, as a stamper, you HAVE to make the cards!  This is only a portion of what I made, but I loved making them.
 Our school colors are Orange and Black, so I just decided to do that for all of them. I used Basic Black, Pumpkin Pie and Whisper White card stock and Silver Glimeer paper(for the squiggle). There's a few products going on here. I cut the squiggles using the Swirly Bird Framelits and attaching with the Fine Tip Glue Pen. I cut the numbers from the Large Numbers Framelits out of Basic Black card stock and used the same adhesive.
I stamped the Congratulations using the stamp set One Wild Ride and stamped in Momento Black Ink. I punched out stars using a retiring punch from Pumpkin Pie..
We too, had a graduate in the house and she actually got her credits early, so she was done with school in January, but flew back from her new home in Loiusianna to walk with her class!

We are so proud of you Sarah!


Wednesday, April 19, 2017

Graduation Invites~

 I'm sharing with you the Graduation invites I made for my daughter who will graduate in one month. She wanted to do a vintage theme party, because it's so her in all reality, so I decided to make her invites instead of purchasing them from the company that makes them.  I used the Blushing Bride and Very Vanilla and Gold theme. I cut two panels from Detailed Floral Framelits from Stampin' Up, did some scoring and then adhered it to another piece of Blushing Bride card stock that was folded in half.
I then printed off her party info and adhered it to the front of the folded piece and tied it shut. I actually think I stripped the gears in my Big Shot doing nearly 100 of these, but it was worth it to make them. She has overcome lots of obstacles to get here and I wanted her to feel that we were proud of her.
I will post after graduation all the decorations that I made to go with her party. Thanks for stopping by and don't forget to go check out the RETIRING GOODS here:


http://su-media.s3.amazonaws.com/media/lastChance/2017_NA_RetiredList/Retiring_List_US.pdf

Saturday, April 15, 2017

Basket Builder Easter projects~

Man! Where oh where has time gone? Either the days are flying by or I'm slacking...okay, maybe a little of both..lol
So, I thought I'd better squeeze in some Easter projects (better late than never) before the big day. I am sharing some workshop projects and a project from my big event I hosted in March.
This first one is a make and take I offered at a March workshop. I am in love with the Basket Builder Bundle. (Say that more than 3 times).  I think this one will stay in my stash for a while.
I did the little basket that holds a small treat (found on Pinterest) and a 3x3 card with handmade envelope. 

 I used the Envelope Punch Board to make the envelope and am using up some retiring DSP from the 2015-17 Pattern Paper Stack- Watermelon Wonder.
 The basket holds a Cadbury Caramel Egg just perfectly. The baskets are easy peasy to make. It actually took longer to cut out the grass, bow and bunny than it did to put the basket together.


 This adorable Easter egg crate was a project that my convention attendees made and took home. I used the So Succulent DSP and made a belly band.  Then wrapped a piece of the Gold 1/8" Ribbon around it, loosely, into a bow. 
 I cut out a basket in Whisper White, the bunny in Chocolate Chip, the two eggs in Bermuda Bay and Melon Mambo, the grass in Pear Pzazz. I had them glue the pieces to the underside of the basket and then added another cut out basket to the backside.
 On the inside, I had them stamp and cut out the "peep" and chocolate bunny and attach them to toothpicks with hot glue. I love the sentiment from the stamp set.  I had them stamp that onto Whisper White using Chocolate Chip ink and then punch out with the Wide Oval Punch and adhere to a toothpick as well. To help them stay up in the crate, we used hot glue in the bottom of the crate and then stuck them into it, stuffing paper shreds around it for added support.
We had a great time and I plan to have another in October centered around Christmas! Well, I'm off to dye some eggs. I hope you all have a wonderful holiday with family!

Tuesday, February 28, 2017

Oh So Succulent~

Hello Tuesday! Just wanted to share one of our cards from class this month. This one is bright and spirited and think this is one of my new favorite color combos. Crushed Curry, Watermelon Wonder and black. I used the Oh So Succulent stamp set to stamp the flowers from in Crushed Curry and Watermelon Wonder inks. 
I used the FREE Salebration offering called So Very Much and stamped it in Basic Black ink. I love how big the word is because so many times, I want to make a nice card to say thank you and this one is nice to have big and bold! I finished it up by punching out half circles with my 1/2" circle punches on each side and wrapped Linen Thread around it and tied a knot.
Next post will be some more cards from February card classes.