Thursday, May 29, 2014

Polka Dot Pieces

Hello! Today is the last day of school for my kiddos and I must say, I cannot believe how fast May went by...I say that every month, but really, it's gone fast! As I said yesterday, I am inspired so many times by Deb Henderson and when I saw this card by her, I decided I wanted to make it too, but I changed out the colors.
I started by layering Basic Gray onto Whisper White and then Daffodil Delight onto that.  I ran another piece of Whisper White through the Alphabet Press embossing folder and laid it down on the Daffodil Delight layer.  I cut a Whisper White Deco Label and layered it onto the embossing piece.  I stamped out three flowers from the Polka Dot Pieces stamp set in Daffodil Delight ink and punched them out with the 1 3/4 Scallop Circle punch and the butterfly and sentiment from the set in Basic Gray ink, punching the butterfly with the coordinating punch, Elegant Butterfly Punch, and then I fussy cut the sentiment out.  I stuck the butterfly down with Mini Glue Dots and folded up the wings for dimension.  I hope you have enjoyed May cards....I need to get to my stamp room and finish designing my June cards.

Wednesday, May 28, 2014

Perfect Blend and Gorgeous Grunge

 Happy Hump Day! Today's card is another from May card class, using the two stamp sets Perfect Blend and Gorgeous Grunge.  I started by layering Tangerine Tango on to Whisper White cardstock and then another Whisper White layer stamped with the "splatter" in Crumb Cake two times.  I ran a piece of Wild Wasabi through the Hexagon embossing folder and stuck it down just over the splatters.  I stamped out the cup two times on Crumb Cake card stock, cut out the cup once and then the lid again and popped it up on Dimensionals.  I cut the "cuff" of the cup from the I AM DSP pack(it will be gone forever after Saturday!) and popped it up as well with Dimensionals.  I stamped out the sayings from Perfect Blend in Tangerine Tango and punched it out using the Artisan Label punch and stamped off the splatter again before stamping it onto the words.
I wanted to finish it off with some sparkle, so I used my Owl Builder Punch and punched out a heart from Champagne Glimmer Paper and tied a bow from the Linen Thread and stuck it all down with a Mini Glue Dot.
Tommorrow, I will show my last card from May class that was inspired by Debbie Henderson.
Have a wonderful day!

Tuesday, May 27, 2014

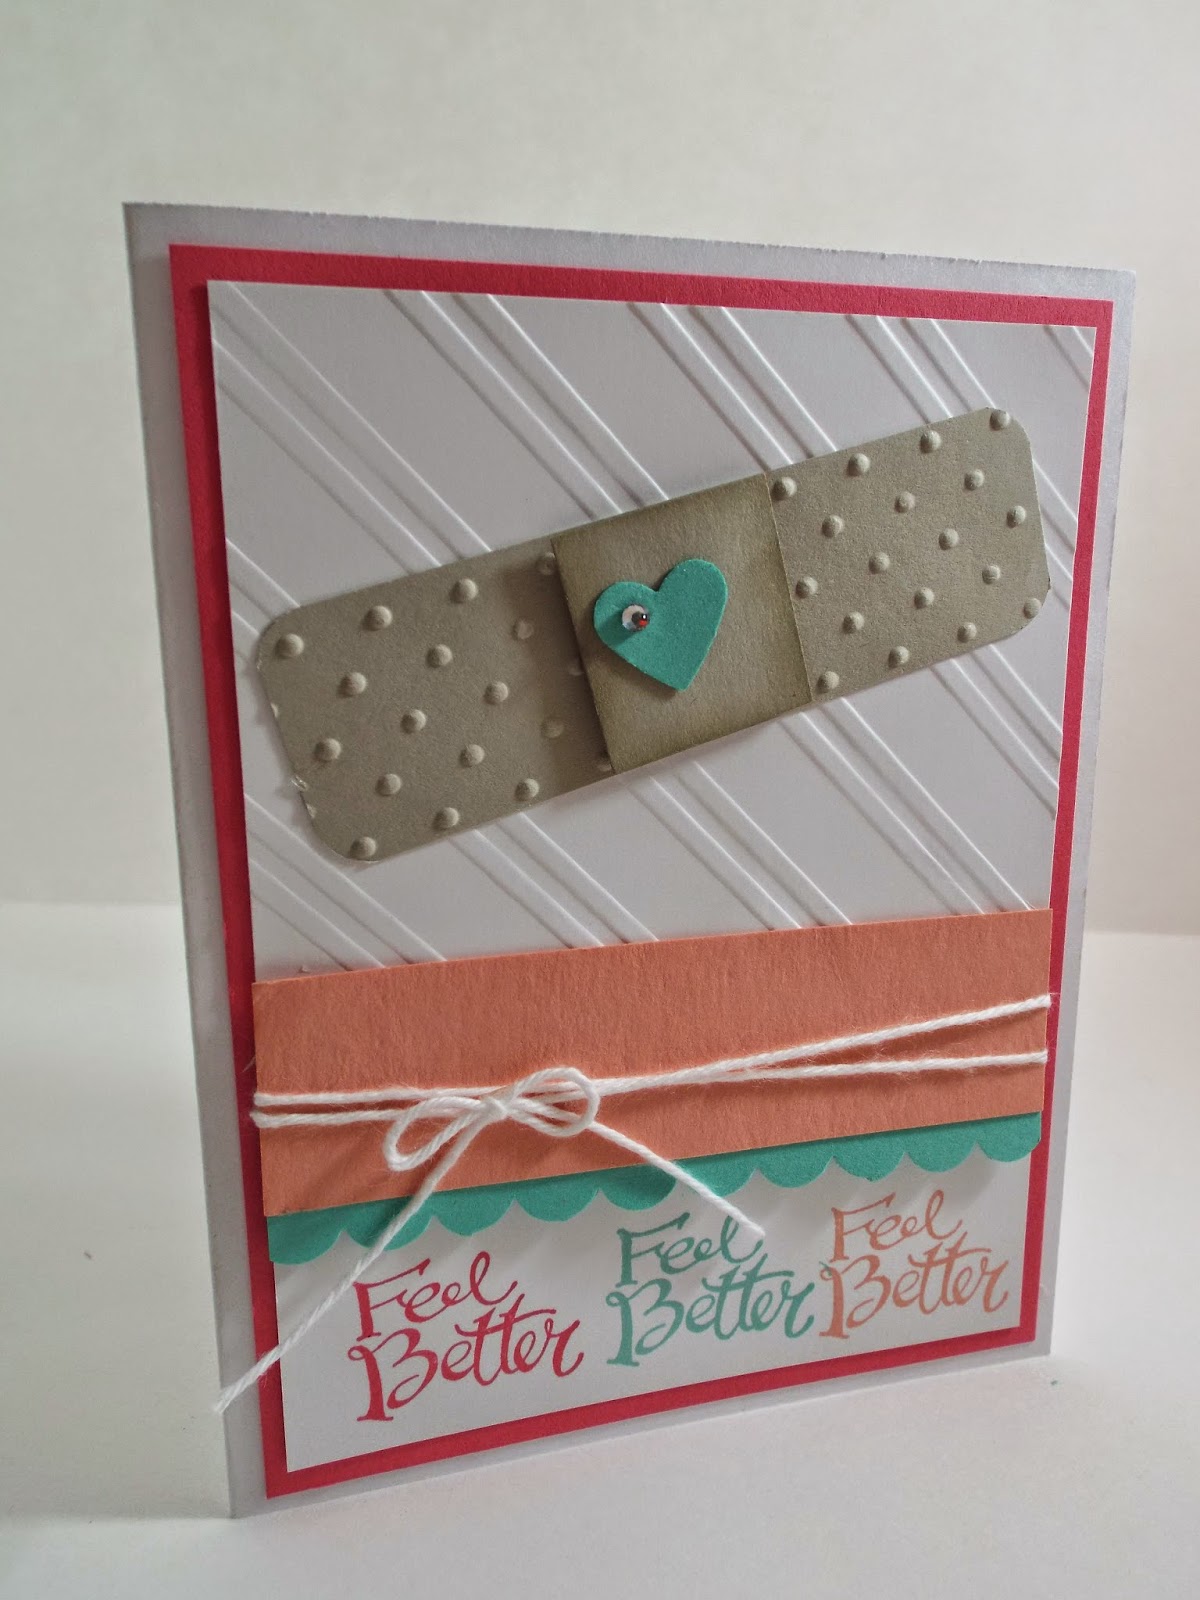
Feel Better!

Well, we made it through Memorial Day weekend and only have 2 1/2 days of school left.  I still can't believe we are already near to June and I need to start planning cards for June classes!   It's finally starting to feel like spring here in Iowa, but I fear that we, like many times already, are going to go straight to summer in the next week.
So, I started by layering Strawberry Slush card stock onto Whisper White and then another piece of Whisper White, I ran through the Strips Folder, just about half of it, as I wanted to leave the bottom un-embossed(not sure if that's a word?) so that I could stamp the words on it.  I stamped out the Feel Better from the Sassy Sayings in Strawberry Slush, Coastal Cabana and Crisp Cantaloupe ink.  I layered a piece of Crisp Cantaloupe onto a Coastal Cabana strip punched with the Scalloped Border punch and then wrapped it with White Baker's Twine and tied a bow.  For the bandaid, I cut strips of Sahara Sand card stock and ran it through the Big Shot using the Perfect Polka Dots folder and then cutting out a 1" square of Sahara Sand and sponging the edges and popping it up on a Dimensional.  I punched out a Small Heart from Coastal Cabana and added a Basic Rhinestone to it to finish it all off.
I hope you have had a chance to see the new upcoming 2014-15 Stampin' Up! catalog..it's full of new fresh products along with some great past products! I hope you all have a wonderful Tuesday!

Monday, May 26, 2014

Simple Stems- TWO Ways!

So, I thought I better get these two cards shown before May 31st! WHY? Well, because these are two of the cards we made at May card class and it showcases ONE stamp set in particular that can be used two completley different ways.  It's called Simple Stems, and it's in the current mini catalog and is only going to be available until May 31st! (it is NOT in the new catalog....) 

 This first one is showing a simple, yet soft way to use the stamp set.  I layered a piece of Soft Sky that I ran through the Big Shot using the Arrows folder onto Whisper White cardstock.  I then layered up Pear Pzazz with Daffodil Delight cardstock with a piece of White Taffeta Ribbon looped behind it  and stamped one of the flower images in Daffodil Delight and Pear Pzazz ink onto another piece of Whisper White.  I then stamped the sentiment in Versamark onto Pear Pzazz cardstock and heat embossed it with Soft Sky Embossing Powder and punched out using the Fancy Label Punch. I added a couple of Basic Pearls to the bottom of the punch out.  Then, we did THIS with the SAME STAMP SET.......!!!
Isn't if so stinkin' cute? How awesome and versitile is that? I started by layering Real Red onto Whisper White and ran a piece of Tempting Turquoise through the Big Shot using the Chevron embossing folder.  I wanted to split up those two colors using a piece of Pumpkin Pie paper from the Designer Series Paper Pack, tagging the end and adding a small bow of  1/8" Black Taffeta ribbon.  I then stamped the "little furry guys" in Pumpkin Pie and Real Red and added some booglie eyes.  I stamped the sentiment from Yippee Skippee in Basic Black.  I love how this turned out and I hope you will want this set for your "collection" as much as I did! Happy Stamping and Happy Memorial Day!

Saturday, May 24, 2014

Color Challenge Card-Work of Art

So, this is the color challenge I decided to try! Not hard for me persay, because I LOVE the Brights! I also wanted to play more with the Works of Art stamp set because it is growing on me at rapid speed! So, here is the card I came up with.

The flower is made using the heart stamp from the stamp set.  A little trick to make it as symetrical as possible: Punch out a 1 3/4 Scalloped Circle to make a "stencil" so that it can be stamped inside the scallops! Yeah, cool huh? I stamped in Melon Mambo, then stamped the stem in Old Olive using the straight line from the set.  I added a Silver Glimmer Paper circle to add just a little dimension.  I have two more ideas for this stamp set, can't wait to play more with it. Thanks for stopping by!

Thursday, May 22, 2014

May My Paper Pumpkin Alternatives

 So, I was so happy to get this month's My Paper Pumpkin kit because I don't have a Happy Father's Day stamp at all! And because I am working on some Father's Day/Masculine Birthday cards for our local flower shop, this was PERFECT. This first card above is so simple to make and use up some retiring stuff, so I made several of these with birthday and some with father's day stamped on them.
This one I really liked how it came out. Again, I am not a punch art type person, but when it comes to masculine, sometimes I find that the punch art comes in really handy!  So this one I used alot of product, including the MPP stamps, and also pulled out the Project Life stamps for the numbers on the golf flag.
Well, I better get back to work on some more or Father's Day will be here before I get them downtown.  LOL! Have a wonderful Memorial Day Weekend!

Sunday, May 18, 2014

Works of Art Part II

 So, here's another quick and easy card I made using the stamp set Work of Art and the NEW In Colors.  This one I simply layered Whisper White with Whisper White and rounded the corners on the top layer. I stamped the polka dot stamp randomly with Lost Lagoon and pooped the layer up on Dimensions from the base of the card.  Then I stamped out the "chevron" stamp with the Hello Honey ink 3 times, not reinking after each.  I ran it through the Big Shot using the Labels dies and then a piece of Lost Lagoon card stock with a slightly larger die to mat it with.
 I stamped the sentiment in two colors, Lost Lagoon for the "just for" and the Momento Black for the word "you".  I punched out a Champagne heart using the new Itty Bitty Accents pack(will be in the new catalog on June 1st!) and popped it up on a Dimensional.  I then punched a hole in the "tag" and threaded some of the Gold Baker's Twine through it and hung it onto a bow tied with the Hello Honey ribbon.
This ribbon is SOOOO soft and easy to tie! Love it already!